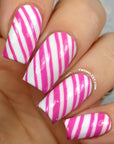

Candy Cane Stencils

$5 Sale • Save
Quantity
Adding to Cart Added to Cart
This sheet contains 16 stencils.
All nail vinyls are handmade by the Twinkled T sisters in Los Angeles, CA. We design, print, and cut all our Twinkled T nail vinyls!

Directions

1. Begin by painting your choice of base polish onto your nails.
2. Once thoroughly dried, paint a coat of clear, fast-drying topcoat onto your nails.
3. Once thoroughly dried, use tweezers to lift nail vinyl off its sheet and place onto your nail.
4. Apply your second choice of polish over the nail vinyl.
5. While the nail polish is still wet, remove your nail vinyl from your nail.
6. Add a topcoat and show off your gorgeous new manicure!


Tips

- Your nail vinyl order will include a special Twinkled T packaging to take your nail vinyls on the go!
- Tips and tricks for using nail vinyls can be found here.
- Use tweezers to lift your vinyls. The oils of hands will remove the sticky residue from the vinyl.
- Remove the nail vinyl while the polish is still wet. Once the polish begins to dry, it will create a stringy and clumpy effect of polish when removing the vinyl.

  • 5 stars: 11 (79%)
  • 4 stars: 1 (7%)
  • 3 stars: 2 (14%)
  • 2 stars: 0 (0%)
  • 1 star: 0 (0%)
J
Jennifer

Didn’t work very well

D
Deanna Villalpando
Easy to use

Easy to use and pulled off the paper easily, not getting stuck like some do.

A
AR (Westlake, US)
Fav vinyls

Love these! They always look perfect

D
Denise Cook (Colleyville, US)
Candy cane stencils

Very cute and easy to use

A
Amanda
Frustrating to use

The end result is really cool, but the stencils themselves are incredibly frustrating to use. Maybe I got a bad batch, but the part that's supposed to be removed to create the stripes doesn't separate from the rest of the stencil when I pull it up & they're hard to pull off the stencil even with a toothpick. I have several TwinkledT stencils that I have no problem with, so idk what is up with these ones!

A
Annette
awesome

These work really well and I would recommend this product to anyone!

A
Annette
awesome

These work really well and I would recommend this product to anyone!

C
Celindy Kellum
Perfect Candy Cane Stripes!

This sheet created perfect for Candy Cane Stripes which were part of my Christmas mani! Another home run ladies! Thank you!

A
Alliya
Much better than using striping tape!

Loved these! Super cute design, and easy to use. Sometimes I had to poke out some of the stripes with a toothpick to use the vinyls, but overall it wasn't too bad.

J
Jennifer K.
Christmas nails

This was my first time using nail vinyls, I had decided to try nail art for Christmas this year. As it was a first attempt it didn't come out perfect but I got so many compliments and people thought it was professionally done!

J
Jennifer K.
Christmas nails

This was my first time using nail vinyls, I had decided to try nail art for Christmas this year. As it was a first attempt it didn't come out perfect but I got so many compliments and people thought it was professionally done!

A
Amanda Scoggins
I wish they were square.

The're definitely a much easier way to achieve this look than using striping tape the way I did last year. My only compliant would be that they only slant in one direction. Whenever I do nail art with an angle like this, I like to mirror the angle on my other hand. Theoretically, I could apply them sideways, but my nails are too long to be fully covered by the narrow side of the rectangle and I don't want to deal with cutting them in half or using two and trying to line them up. At that point, I may as well just use striping tape. This (really very minor) issue could be solved by making the vinyls truly square or by offering a left slant and a right slant version.

M
Michelle K.
Candy cane stencils

I absolutely loved using these and I plan on buying a lot of other stencils

M
Michelle K.
Candy cane stencils

I absolutely loved using these and I plan on buying a lot of other stencils